자바 버튼과 패널, 레이아웃을 사용하여 계산기 모양을 만들겠습니다.
BorderLayout 과 GridLayout 을 사용합니다.
계산기가 아니라 모양인 이유는? 이벤트를 넣지 않아 눌러도 아무 일도 일어나지 않기 때문입니다.^_^
1 2 3 4 5 6 7 8 9 10 11 12 13 14 15 16 17 18 19 20 21 22 23 24 25 26 27 28 29 30 31 32 33 34 35 36 37 38 39 40 41 42 43 44 | import java.awt.*; class MyFrame extends Frame{ private Label lb = new Label("계산기", Label.CENTER); private Button bt[] = new Button[16]; private String[] str = new String[] { "7","8","9","+","4","5","6","-","1","2","3","*","0","=","%","/"}; private BorderLayout bl = new BorderLayout(); private Panel p = new Panel(); private GridLayout p_gl = new GridLayout(4,4, 3, 3); public void init() { this.setLayout(bl); this.add("North", lb); this.add("Center", p); p.setLayout(p_gl); for(int i=0; i<bt.length; ++i) { bt[i] = new Button(str[i]); p.add(bt[i]); } } public MyFrame(String title) { super(title); this.init(); this.setSize(400,300); Dimension screen = Toolkit.getDefaultToolkit().getScreenSize(); int xpos = (int)(screen.getWidth()/2) - this.getWidth()/2; int ypos = (int)(screen.getHeight()/2) - this.getHeight()/2; this.setLocation(xpos, ypos); this.setResizable(false); this.setVisible(true); } } public class Test { public static void main(String[] args) { MyFrame mf = new MyFrame("frame"); } } | cs |
	private Label lb = new Label("계산기", Label.CENTER);
	private Button bt[] = new Button[16];
	private String[] str = new String[] {
			"7","8","9","+","4","5","6","-","1","2","3","*","0","=","%","/"};
먼저 라벨과 버튼, 버튼에 들어갈 숫자 배열을 생성합니다.
라벨에는 계산기라고 적고, 가운데 정렬을 합니다.
버튼은 16칸으로 설정합니다.
str 배열에는 계산기 안에 들어갈 숫자와 문자를 입력합니다.
private BorderLayout bl = new BorderLayout();
	private Panel p = new Panel();
	private GridLayout p_gl = new GridLayout(4,4, 3, 3);
BorderLayout 과 패널, GridLayout을 생성합니다.
그리드 레이아웃은 맨 위의 라벨이 들어갈 곳을 제외하면 4*4칸이고 가로세로 간격은 각각 3으로 설정하였습니다.
public void init() {
		this.setLayout(bl);
		this.add("North", lb);
		this.add("Center", p);
북쪽 버튼에는 라벨을 넣고, 가운데 버튼에는 패널이 오게 설정합니다.
BorderLayout 을 사용할 때는 방향을 지정해 주어야 합니다.
p.setLayout(p_gl);
		for(int i=0; i<bt.length; ++i) {
			bt[i] = new Button(str[i]);
			p.add(bt[i]);
		}
for을 이용하여 버튼(위에 설정한 16개) 안에 들어갈 문자(String[]에 있는 문자)를 설정합니다.
0번째 버튼(첫번째 버튼)에는 0번째 글자(7)이 들어가게 됩니다.
public MyFrame(String title) {}
안에는 프레임 설정을 합니다. 창의 사이즈와 실행했을 때 화면 정가운데에 오게 설정했습니다.
또, 창 늘리기를 불가능하게 설정하고, 마지막으로 창을 볼 수 있게 합니다.
public class Test {
	public static void main(String[] args) {
		MyFrame mf = new MyFrame("frame");
	}
}
메인에서 프레임을 호출합니다.
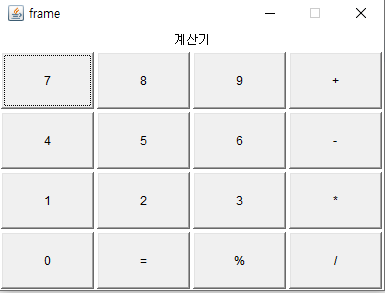
잘 적용되었습니다.
'Study > Java' 카테고리의 다른 글
| 용어 정리(UDP관련) (0) | 2022.04.13 |
|---|---|
| 자바 입출력 (0) | 2022.04.08 |
| 자바 재귀함수를 이용하여 피보나치 수열 구하기 (0) | 2022.03.21 |
| 자바 재귀함수를 이용하여 팩토리얼 구하기 (0) | 2022.03.21 |
| 자바 배열 및 random, System.in.read 를 이용하여 야구 게임 만들기 (0) | 2022.03.18 |